Introduction
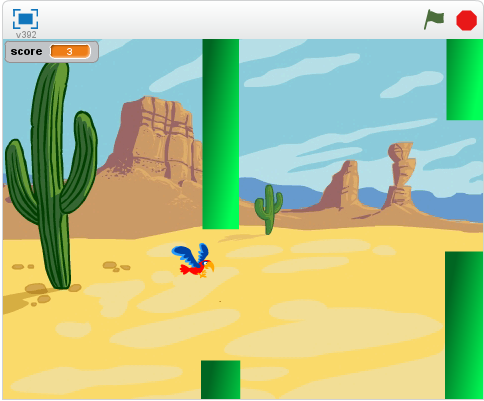
In this project we’ll make our own version of the highly popular mobile game Flappy Bird. This project requires Scratch 2.0.
Press the space bar to flap and try to navigate through the gaps in the pipes!

Step 1: Make Flappy fall
Activity Checklist
- Start a new Scratch project. Delete the cat by right-clicking it and selecting Delete
- Replace the background with an outdoor landscape. desert is a good choice.
- Add the Flappy character. You’ll need a sprite with costumes for wings up and wings down. parrot is a good choice.
- Change the name of your sprite to Flappy.
Give Flappy the following script:
when FLAG clicked
    go to x: (-50) y: (0)
    forever
        change y by (-3)
Test Your Project
Click the green flag, does Flappy start in the middle of the screen and then fall to the bottom?
Save your project
Step 2: Make Flappy fly
Next, we want Flappy to flap upwards when you press the space bar.
Activity Checklist
- Click on the Costumes tab and name the costumes wings up and wings down.
Now switch back to the Scripts tab and add this script:
when [space v] key pressed
    switch costume to [wings down v]
    repeat (10)
        change y by (6)
    end
    switch costume to [wings up v]
    repeat (10)
        change y by (6)
    end
Test Your Project
Click the green flag, are you able to control Flappy with the space bar? Do you notice that sometimes you press the space bar but Flappy doesn’t move? We’ll fix that next…
Save your project
Step 3: Fix the controls
We’d like Flappy to respond every time we press the space bar. But when we push the space bar Flappy begins two loops of movements. If we push the space bar again before these loops have finished, Scratch ignores the second press. To solve this, we’ll use a variable to count up how many flaps we need to do.
Activity Checklist
- Disconnect the blocks under the
when space key pressedand put them to the side (we’ll use them in a few moments.) - Make a new variable
For this sprite onlyand call itflaps. Add the following script by draging in the blocks you put aside:
when FLAG clicked
    set [flaps v] to [0]
    switch costume to [wings up v]
    forever
        repeat until <(flaps) = [0]>
            change [flaps v] by (-1)
            switch costume to [wings down v]
            repeat (10)
                change y by (6)
            end
            switch costume to [wings up v]
            repeat (10)
                change y by (6)
            end
Finally, add to your
when space key pressedevent:when [space v] key pressed change [flaps v] by (1)
Test Your Project
Click the green flag, does Flappy now flap once for each time you press the space bar?
Save your project
Step 4: Add the pipes
Next we’ll add some obstacles for Flappy to fly through.
Activity Checklist
- Click on the
Paint new spritebutton. - Name your costume pipe.
- If the costume is in
Bitmap Modeclick on theConvert to vectorbutton. - Click on the
Zoom -so that you can see the entire drawing area. - Click on the
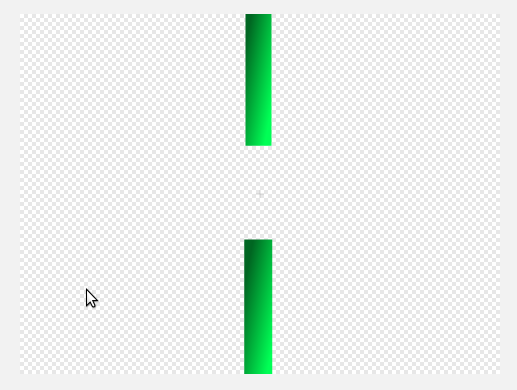
Rectangle, pick a colour, and click on theFilled rectanglebutton. - Click and drag two boxes, one from the top middle and one from the bottom middle as shown:

- You can shade your pipes by clicking on the
Color a shapebutton and click on theHorizontal gradientbutton. Choose two shades of the same colour one for the foreground and one for the background. When you click to fill the shapes, the colours will fade between your chosen colours. - Name your sprite Pipe.
Save your project
Step 5: Make the pipes move
Next we’ll make the pipes move and arrange them randomly to provide an obstacle course for Flappy.
Activity Checklist
- Click on your Pipe sprite and select the
Scriptstab. Add the following scripts:
when FLAG clicked
    hide
    set size to (200)%
    forever
        create clone of [myself v]
        wait (2) secs

when I start as a clone
    go to x: (240) y: (pick random (-80) to (80))
    show
    repeat (120)
        change x by (-4)
    end
    delete this clone
Test Your Project
Click the green flag, do pipes appear with gaps to fly through at different heights? If you find it difficult to navigate Flappy through the pipes without touching them, you can make the gap bigger in the pipe sprite by editing the costume.
Save your project
Step 6: Detect collision with the pipes
To make the game a challenge, the player needs to guide Flappy through the gaps without touching the pipes or the edges of the screen. Now we’ll add some blocks to detect if Flappy hits something.
Activity Checklist
- Let’s add a sound to play when Flappy collides. Click on the Flappy sprite then on the
Soundstab. - Click the
Choose sound from librarybutton. - Pick a collision sound for Flappy. The screech sound is good.
- Now click back on the
Scriptstab. Add the following script:
when FLAG clicked
    wait until ((touching [edge v]?) or (touching [Pipe v]?))
    play sound [screech v]
    say [Game Over!]
    broadcast [GameOver v]
    stop [other scripts in sprite v]
Click on the Pipe sprite and add a script:
when I receive [GameOver v]
    stop [other scripts in sprite v]
Test Your Project
Click the green flag, does the game end when Flappy touches a pipe or the edge of the screen?
Save your project
Step 7: Add scoring
The player should score a point every time Flappy makes it though a pipe. Let’s add that next.
Activity Checklist
- Let’s add a sound to play when Flappy scores a point. Click on the Pipe sprite add a score sound. bird is a good choice.
- Now click back on the
Scriptstab. - Make a new variable
For all spritesand call itscore. - Add a block to set the score to 0 when the flag is clicked.
Add the following block:
when I start as a clone
    wait until <(x position) < ([x position v] of [Flappy v])>
    change [score v] by (1)
    play sound [bird v]
Test Your Project
Click the green flag, does the player score points for flying Flappy through the pipes?
Save your project
Things to try
- How many ways can you make this game easier or harder?
- Well done you’ve finished the basic game. There are more things you can do to your game though. Have a go at these challenges!
Challenge 1: add a high score
- Make a new variable and tick the
Cloud variable (stored on server)box. Call the variablehi-score when the game is over check if you need to set a new high score:
when I receive [GameOver v]
    if <(score) > (hi-score)> then
        set [hi-score v] to (score)
    end
    stop [other scripts in sprite v]
Test Your Project
Click the green flag, does your score update the hi-score?
Save your project
Challenge 2: add gravity
When something falls under gravity it doesn’t usually fall at a fixed rate. For this challenge we will make Flappy fall as if under gravity.
- Add a new variable
For this sprite onlyto Flappy and call itrise. Change Flappy’s falling script:
when FLAG clicked
    set [rise v] to [0]
    go to x: (-50) y: (0)
    forever
        change y by (rise)
        change [rise v] by (-0.4)
And change Flappy’s flapping script:
when FLAG clicked
    set [flaps v] to [0]
    switch costume to [wings up v]
    forever
        repeat until <(flaps) = [0]>
            change [flaps v] by (-1)
            switch costume to [wings down v]
            change [rise v] by (8)
            wait (0.2) secs
            switch costume to [wings up v]
            wait (0.2) secs
Test Your Project
Click the green flag, does Flappy now accelerate when falling and flapping?
Save your project
Challenge 3: fall off screen
When the player loses make Flappy fall off the bottom of the screen before ending the game.
- Replace the
broadcast GameOverblock withbroadcast Fall Now add the following scripts:
when I receive [Fall v]
    repeat (10)
        turn ccw (5) degrees

when I receive [Fall v]
    repeat until <(y position) < [-180]>
        change y by (rise)
        change [rise v] by (-0.4)
    end
    hide
    broadcast [GameOver v]
Don’t forget to add a
showblock and reset Flappy’s direction when the game restarts.
Test Your Project
Click the green flag, does Flappy now fall off the screen after hitting a pipe? Does Flappy reappear in the correct orientation when restarting the game.
Save your project
Well done, you’ve finished! Now you can enjoy your game!
Don’t forget you can share your game with all your friends and family by clicking on Share on the menu bar!


